Creating a new plugin
Overview
In this tutorial we will guide you through the process of creating a new plugin for MAPHIS. At the end, our plugin will allow the users to segment images through simple thresholding based on user defined color.
MAPHIS plugin system
A plugin in MAPHIS is simply a grouping of various actions and tools.
Actions represent code that generates segmentations or computes properties of segmentation, while tools provide ways for the user to work with segmentations in an interactive manner.
All plugins are stored in the plugins folder of the maphis package, whose location depends on the way you've installed MAPHIS. You can simply access the folder by clicking Plugins>Open plugins folder in MAPHIS.
Plugin folder structure
Below is illustrated the full structure of MAPHIS plugin. For a plugin to be recognized by the application there must be plugin.py and __init__.py located in the folder, all other folders and directories are optional, depending on what functionality you want to provide.
It is also good to include a README.md file containting any useful information about your plugin, especially if you plan to publish it.
maphis/plugins/
    ├───custom_plugin/
    |    ├───__init__.py
    |    ├───plugin.py
    |    ├───README.md
    |    ├───general/
    |    |   ├─── *any number of python files*
    |    |   └───__init__.py
    |    ├───project_types/
    |    |   ├─── *any number of python files*
    |    |   └───__init__.py
    |    ├───properties/
    |    |   ├─── *any number of python files*
    |    |   └───__init__.py
    |    ├───regions/
    |    |   ├─── *any number of python files*
    |    |   └───__init__.py
    |    └───tools/
    |    |   └───__init__.py
Plugin implementation
Now we will get to the actual implementation of the plugin. Our plugin will provide a segmentation computation based on simple thresholding, and a property computation of area of segmented regions.
Create plugin folder
First we have to create a folder for our plugin. Do so in the plugins folder of MAPHIS as mentioned in the previous section and inside create the files plugin.py and __init__.py. We will name the folder as tutorial_plugin.
Filling out plugin.py
Next thing MAPHIS expects is to find some code inside the file plugin.py, see below.
As you can see, your Tutorial plugin class contains (besides the __init__ method) one method called blue_threshold. The important piece of code is this:
The usage of the @region_computation decorator tells MAPHIS that the method blue_threshold is the __call__ method of RegionComputation.
Notice that the documentation for the __call__ method of RegionComputation does not specify instance of RegionComputation as the first parameter. However, as the __call__ method is an instance method of RegionComputation it does take an instance of RegionComputation as its first parameter. Hence why our blue_threshold method also takes an instance of RegionComputation as its first parameter. This similarly applies in cases when you are implementing functions that should act as GeneralAction and PropertyComputation.
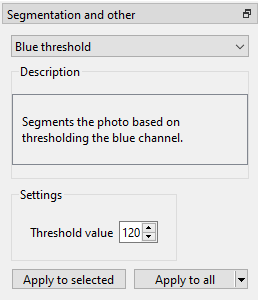
If you start MAPHIS now, you should find our Blue threshold computation in the Segmentation and other panel on the right, see image below.

Let's hit Apply to run the computation and see the result below.

As we can see, most of the specimen got segmented correctly, however there are some pixels that it missed and it also segmented the place where the two blue pieces of background overlap. Both of these errors are easily correctible by the use of interactive tools like the Brush.
User parameter: threshold value
Our segmentation computation will not be much of a use if the intensity of the blue background changes from photo to photo, since the threshold value is hard-coded in the source code.
To provide a bit of flexibility, we can offer the user to choose the appropriate thresholding value in the form of a user parameter.
The user parameter we want to include in our computation will be an integer number and we can easily implement this with the usage of the @param_int decorator like this:
User parameter for threshold:
Other types of user parameters
Besides integer (decorator @param_int) user parameters, you have the option to provide boolean (@param_bool) in the form of checkboxes or text string parameters (@param_string) in the form of text fields.
'Perimeter' property
In addition to the simple blue channel thresholding operation, our plugin will also offer computation of perimeter for regions. This is a good oportunity for us to see how to handle pixel and real units.
Just how we marked the blue_threshold method with the @region_computation decorator, we will decorate the method for computing region perimeter with the @scalar_property_computation decorator.
We need to import a few more things first, so the import statement should look as follows:
Here's a brief explanation of what we're importing:
skimage.measure.perimeter- a function for computing the perimeter of binary regions from thescikit-imagelibraryscalar_property_computation- the decorator that will turn our method into a proper implementation ofPropertyComputationScalarValue- a representation of a scalar value with or without unitsureg- an instance ofpint.UnitRegistry; it stores units and their definitionsRegionsCache- storesRegionobjects of a segmentation; the regions are subregions of the segmentationRegionProperty- an object representing a computed property of a specific segmentation region. AllPropertyComputations return a list ofRegionPropertyfrom their__call__methods, and so will ourperimetermethod.
Now we get to the implementation of the the computation itself:
The implementation is short and simple.
- the
forcycle at line 57 is what allPropertyComputationshave in common - we iterate over all integer labels of regions that the user scheduled the computation for. - if there is no region with
region_labelin the segmentation, we skip (lines 60-61) to anotherregion_label - we obtain a
Regionwithregion_labelthat is present in the segmentation by accessing it through theRegionsCache(line 62) - Compute the perimeter of the region by calling the
skimage.measure.perimeteron themaskattribute ofregion. Immediately we construct aScalarValuefrom the raw perimeter value (which is in pixels) and endow it withpixelunits like so: - Next we need to prepare a
RegionPropertyinstance that will store the perimeterScalarValue. To obtain a properly set up instance ofRegionProperty(with correct metadata needed by MAPHIS), we use the methodexampleof thecompobject. We just need to set thelabelattribute of the returnedRegionPropertytoregion_label(lines 66-67). - If
photohas a scale value, we convert the pixel value of perimeter to real units and set thevalueattribute ofRegionProperty(lines 70-71), otherwise we will store theregion_perimeter_pxvalue in thevalueattribute (line 73). - Insert the
RegionPropertyto the list of computed perimeter properties that will get returned after allregion_labels have been processed (line 75). - Lastly, return the computed
RegionPropertyobjects.
That's it to our 'Perimeter' property.
When implementing your own properties, you can provide user parameters to customize the behaviour. You can do it the same way as you do for RegionComputations, see here and here.